Wednesday, September 29, 2010

On Squashes and Stuffing

When I was in Seattle recently visiting my sister, we took a break from all the amazing restaurants out there and cooked dinner at her house one night. She receives locally grown veggies once a week from a veggie box and blogs about it! Check it out at: http://ilovetoveg.wordpress.com/
She had some veggies left over that needed to be used up, and after tossing around several ideas, we came up with Pattypan squash stuffed with wild rice and some of the other veggies in the fridge. I debated adding cheese and decided against it, which I later regretted. To accompany the beautiful little squashes, we decided to make salmon since Seattle is the place for fish and I am trying to convert the others to being fish eaters (My sister, her boyfriend, and my boyfriend all are not fish people but were willing to try salmon my way.) My favorite thing to serve with salmon, even though it didn't really go with the stuffed squash theme, is fruit salsa. I usually use mangoes or pineapple, but we found some amazingly sweet nectarines at the market and decided to use those! Strawberries are also a nice option.

To start the squash, cut off the end with the stem to form a lid and scoop out the seeds.
Then place the squashes in a baking dish, sprinkle with olive oil, salt, and pepper. Replace the lid and bake until tender but not overly soft. (putting the lid back on helps to steam the squash which expedites the cooking process as well)
Fill with the stuffing you already made and return to the oven until everything is warm and enjoy!

For the stuffing I used steamed red rice but wild, brown, or black rice would also work. I sauteed some diced bell peppers, onions, garlic, kale, and roasted beets, all from the veggie box, and mixed in the rice. Goat cheese or feta or parmesan would be a good addition to the filling as well.


My favorite way to cook salmon is to cut it into medallions and pan sear it with a sprinkle of salt, pepper, cayenne, and a tiny bit of cinnamon-sounds odd, but goes really nicely with the fruit salsa. When you buy salmon from a fish counter at a grocery store, sometimes you can convince them to skin the fish for you. Otherwise, at home you can use a sharp, thin knife to slice the meat off the skin. Season each piece of fish and sear the fish in a hot pan in a bit of olive oil until a nice crust has formed on each side.

This fruit salsa recipe can be used in many different ways-on fish tacos, with grilled chicken, or even with just chips.
We used nectarines, some red onion, diced bell pepper, a little fresh spicy pepper, and the juice of a lemon or lime. If you can make the salsa a little while ahead of time, the fruit juices a little bit and makes it hold together a little better and also allows the flavors to meld a bit.
Serve the salsa over the salmon and enjoy!


We enjoyed a fresh tomato and baby lettuce salad with just a little salt, pepper, oil, and vinegar along with our delicious meal. Even the non-fish eaters enjoyed the meal, so it was a hit!
Another stuffed squash option is using delicata (?) squash.
Peel the squash, scoop out the seeds, and roast in the oven until tender. Stuff the squash with sauteed onions, garlic, poblano peppers, and corn mixed with goat cheese, bread crumbs, and herbs. Top with a few bread crumbs, and bake until everything is warm! Serve topped with a roasted red pepper or tomato sauce. You could also put the squash and sauce on some spaghetti tossed with olive oil, parmesan cheese, and fresh herbs. There are endless possibilities for stuffed squash. Try whatever is in season and Chop On!

Tuesday, September 14, 2010

On pasta and the simple things

I have returned to the world of blogging after a busy, fun filled summer! I had a nice little garden of plants in pots that is still producing tomatoes, peppers, and herbs that I enjoyed using in some delightful summer cooking (there was lots of grilling involved). I also frequented our local farmers market and got a bunch of tasty, locally grown veggies. Some of my favorites are the variety of summer squashes and peppers available. They come in such pretty colors, they are hard to resist.


Some of these sautéed in olive oil with a little salt and pepper and some fresh herbs make a simple and delicious side dish. Or toss some spinach feta sausage in with the veggies and put it over quinoa and you have a tasty simple lunch or dinner!

One thing I really learned to appreciate in Italy was the simplicity of cooking. It is possible to create really amazing dishes with uncomplicated ingredients. Pasta is an example of where this theory really holds true. My chef told me that when it comes to pasta, simple is always better. He suggested just some fresh herbs, a little olive oil, and parmesan cheese when I was at a loss for an idea for lunch one day. Now that I am home, I occasionally make really wonderful, easy pasta dishes. One of my favorites is pasta (I usually use linguini) with some crushed red pepper flakes, olive oil, a squeeze of lemon juice, salt and plenty of fresh cracked pepper, and of course, parmesan cheese. Another dish I made recently that was really amazing and very simple was quinoa pasta tossed with some fresh tomatoes and fresh basil from my garden topped with salt, pepper, and cheese! It looks really bright and fresh too. It is sure to impress as a nice light dinner or a starting course in true Italian style!


I think it is important to appreciate the simple things in life, especially when it comes to food. The best flavors usually come from whole ingredients like fresh herbs, tomatoes or berries picked right off the bush, or carrots right from the dirt. I experimented with growing purple heirloom carrots in a large pot this summer and they are great! (though small and not very purple)


When you are cooking at home and experimenting with foods, I highly recommend keeping simplicity in mind. In everyday life it is easy to get distracted by everything going on, but when you get in the kitchen to cook-maybe focusing on simple, fresh, tasty ingredients can help you to focus on the other simple pleasures in your life.
Keep things simple, and chop on!

Sunday, April 18, 2010

On Trays and Catering

Remember the tasting that happened about a month ago?
Well...The event FINALLY happened (about a week ago). And I am FINALLY getting around to posting pictures of the actual party.
Everything turned out great even though we had a break room with a sink, fridge, a toaster oven, and small table to work with. I got a lot of positive feedback from the guests-one was a chef who came out of his way to let me know what a great job I did and offer his praise for the food! It's always great to hear good reviews from someone in the industry.
Well, here we are getting ready-all the stuff in the car and the obligatory 'Mom photo'.

This is one side of the buffet: the sundried tomato and ricotta bruschetta, stuffed cherry tomatoes, chevre and cucumber triangles, tarragon chicken salad bites, and the brie, turkey, bacon, and jam sandwiches (totally toasted in an ancient toaster oven).


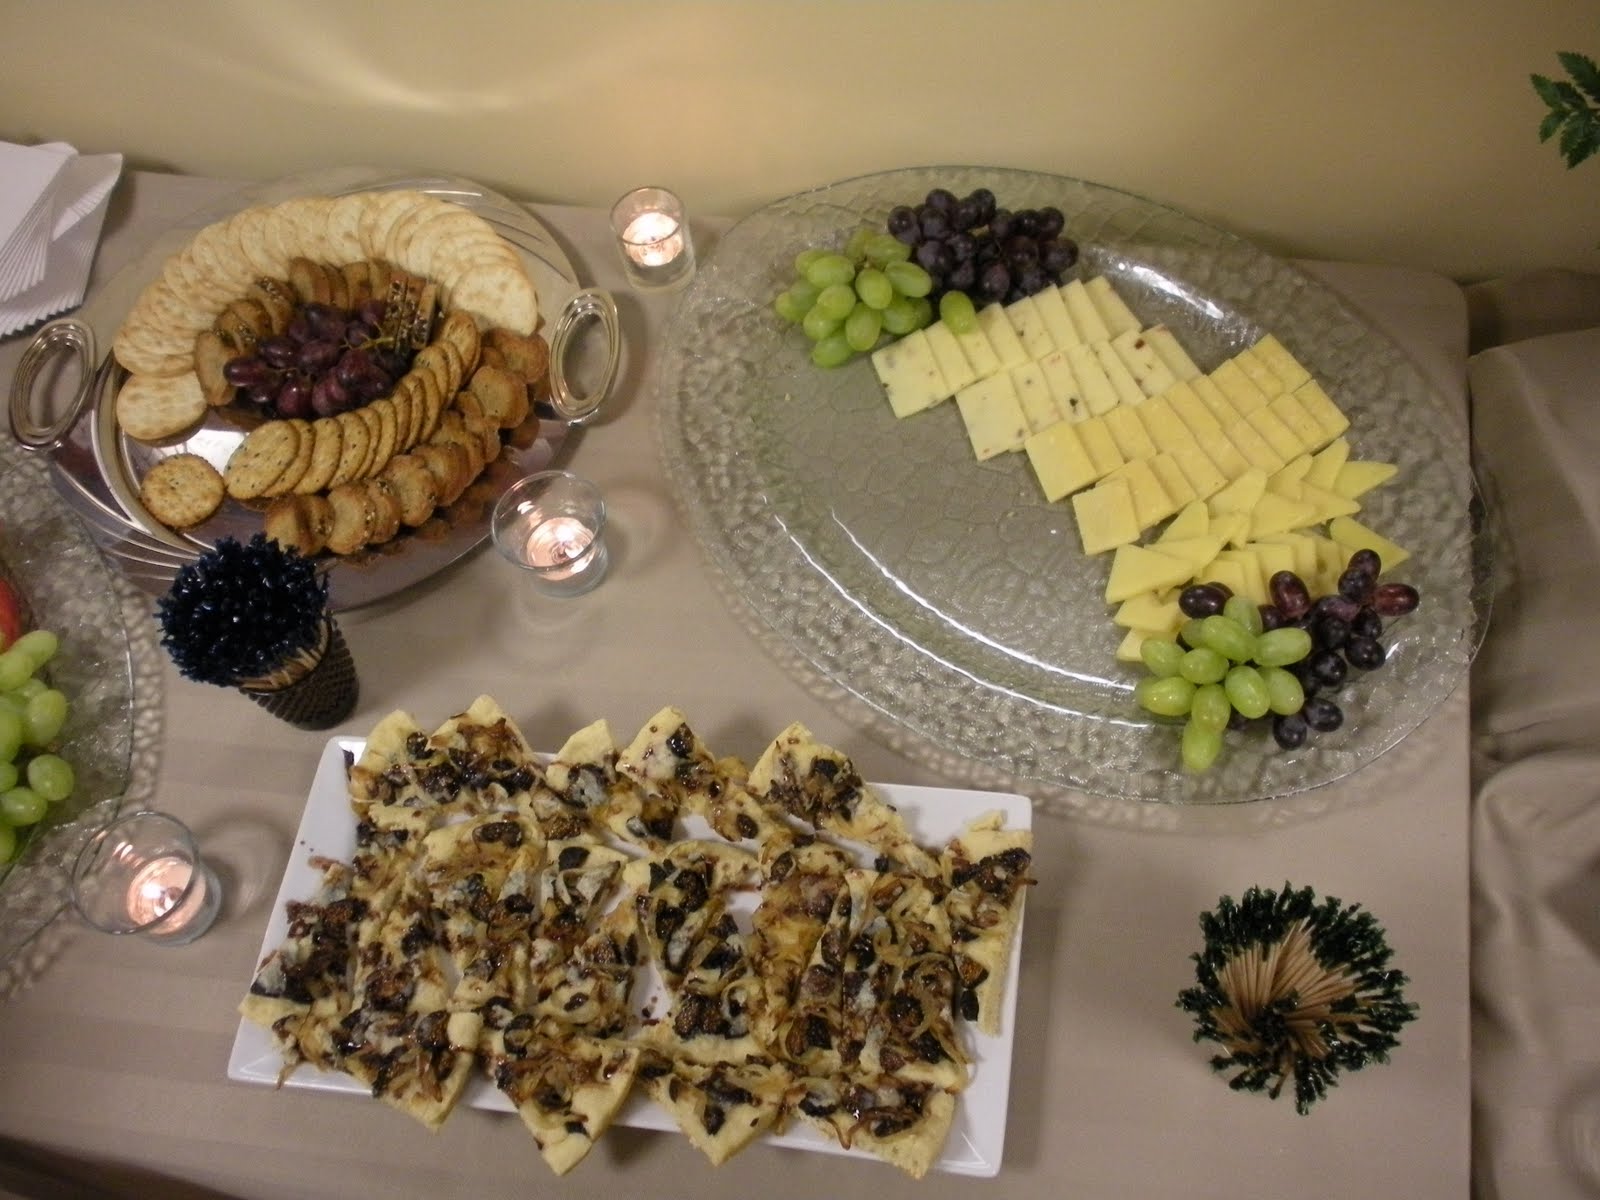
And the rest of the buffet- our cheese and fruit platters that people were overly excited about and chowed down on immediately, caramelized onion and fig bars, and the citrus shrimp cocktail.


Well, there will be more posts to come soon! It's gardening season and I have been staying busy teaching classes.
Enjoy the coming spring and all of it's exciting flavors! Chop on.

Sunday, April 4, 2010

On coconuts and currying.

These last couple weeks have been relatively uneventful in my kitchen. I have a new job working in an Italian restaurant here in town....but not in the kitchen. (waiting tables...better money)
I have, however, done a small amount of experimenting for an upcoming class I am teaching on risotto. I made an asparagus risotto...(2 actually, different timing on the asparagus addition)....and a spicy, fire roasted tomato risotto.
Both (all 3) types turned out quite well. I learned that adding sauteed asparagus at the end of the risotto process works better than cooking it in the risotto itself. The color is brighter and the texture is more pleasing-the slight crunch of the asparagus adds to the creamy risotto. The tomato risotto was another experiment that went well (Recipe and pictures to follow). I used fire roasted canned tomatoes for this batch which added a different sort of flavor than plain tomatoes would have. The liquid was a mixture of chicken broth, water, red wine, and herbs to add a little color and extra flavor to the finished product. I started off with a mixture of finely chopped carrots and onions and could have used celery-but I didn't have any in the fridge. That carrot, celery, and onion mixture is known as (mirepoix in French) soffritto in Italian and is typically used to start risottos, soups, and sauces.
Ok, now for the good stuff.
Tomato risotto recipe:
Soffritto- 1/2 carrot, 1/2 celery stalk, 1/4 onion all chopped finely.
3/4 c arborio rice
1 can diced or crushed tomatoes
very hot (near boiling) liquid- broth, water, red wine, salt and pepper, basil


1. Sweat soffritto in olive oil on a large bottomed pan until tender.
2. Add rice and stir to coat rice in oil, then deglaze with white wine or broth mixture.
3. Stir in tomato product and4. add enough broth mixture to cover the rice completely.
5. Stir continuously over medium high heat as the rice cooks and absorbs the liquid.
Add more broth mixture as needed until the rice is cooked to al dente.
Season to taste with salt, pepper, and parmesan cheese. Mount with about 1/2 Tbs butter for extra creamy-ness.


I served the rice with pan seared, herbed chicken breast- Chicken marinated in herbs and garlic, seared in the pan, then braised in some of the canned tomato product from the risotto.


Now, for the title dish. (and you thought I had totally forgotten)
Curry is a favorite of mine to make because it is really tasty and can be made with things that I usually have around the house, except for the coconut milk. The inspiration for this batch was the fresh coconut I got. (If you have never tried it, its fun to break open and great anger management therapy)
The best way to deal with a whole coconut is to first hammer a nail into each of the 3 eyes, and turning it upside down over a glass to drain the liquid inside.
Once empty, I like to smash the coconut on a sidewalk until it is in manageable pieces.
I usually end up eating the white flesh, but I tried shaving small pieces off and toasting it, which really brings out the nutty flavor.

This particular batch of curry consisted of chicken marinated in red curry paste, red bell peppers, red onion, potatoes, frozen green beans, and carrots. I used a combination of red curry paste and yellow curry powder, 1 can of coconut milk, a bit of powdered coconut milk (powdered coconut flavor-mostly the fat solids. Very tasty and fun to use!), and red pepper flakes.
I serve my curry on coconut saffron rice; this time I used the fresh coconut juice as part of the liquid for cooking the rice and a few treads of saffron that adds a little color and flavor.

I hope everyone goes out to purchase a fresh coconut and enjoys the stress relieving pleasure of throwing a coconut on the ground and seeing it shatter. Good luck with your kitchen experiments, and Chop On!

Monday, March 15, 2010

On dessert and demo-ing


I spent most of Thursday shopping for ingredients, Friday was cooking/prepping, and Saturday was more cooking and the actual party. A neighbor hosted an Italian dinner party for 12 that I "catered". The lady of the house had attended a couple of my pasta making classes and other dinners and her husband was jealous that he didn't get to come enjoy the food on those occasions. They decided to host a dinner so all the men could partake in the fun of making pasta and enjoying great food. The dinner consisted of a cooking demonstration of the lasagnettas (little lasagnas) we were serving for the first course of the meal, then a cocktail hour with cheeses, olives, and appetizers, then the meal itself and lots of wine.


The menu:
First Course, Lasagnetta with roasted pepper sauce.

Salad with red pepper, red onion, sundried tomatoes, goat cheese, homemade croutons, and my roasted red pepper and tomato vinaigrette.

Beef tenderloin with a port and cherry sauce (amazing!), roasted garlic asparagus, and lemon thyme carrots.

Dessert (made by my lovely assistant and sous chef, James) was a fabulous chocolate cake with a white chocolate mousse and strawberry champagne sauce garnished with strawberry dust and fresh strawberry.

The lasagnetta, salad, and dessert were plated and served while the main course was served family style and passed (as you can tell by the pictures).


The demo of the lasagnetta was a lot of fun. Everyone got ONE (some snuck a second) cocktail before so there were several distractions, but it made the process more entertaining. I had the pasta dough made and ready to roll and cut. I sauteed the veggies for the filling and blended the sauce as part of the demo.

Lasagnetta recipe:
This is my version of a recipe we made at ICIF in Italy when I was studying there. It was one of my very favorite things we made in class. Very tasty, fun to make, and impressive to serve to friends.

1 batch pasta dough rolled to desired thickness and cut to desired size.
Cook pasta for about 5 min in boiling salted water and lay flat on paper towels to cool and dry.

Filling-
1 bell pepper julienned
1 zucchini julienned
1/2 red onion sliced thin
1 tub ricotta cheese
Parmesan cheese
Salt and pepper to taste
Saute veggies in olive oil until tender. Deglaze with a splash of balsamic vinegar and season. Mix with ricotta and parmesan, salt and pepper to taste.

Sauce-
1 roasted red pepper
1/2 pint roasted grape tomatoes
splash of red wine and balsamic vinegar
red pepper flakes as desired
Salt and pepper to taste
Blend all ingredients until smooth. An immersion blender works best, but a regular blender will work too.

Constructing the lasagnetta:
Lightly oil the bottom of a baking pan and place first layer of pasta on the oiled pan. Top with ricotta and veg mixture and alternate with pasta circles for as many layers as you want; I have found 4 pieces of pasta is usually best. Top the final piece of pasta with a dribble of olive oil to prevent drying out and parmesan cheese. Bake at 350 until warm, about 15 min. Serve with warm red pepper sauce and enjoy! Be careful- it gets messy, but is totally worth it.


I am guessing there are some questions regarding this so called strawberry dust....
This was an experiment of mine. At the Ristorante Magorabin (the restaurant I did my stage at in Torino, Italy) we had an orange dust that was made by dehydrating orange rind then grinding it in a food processor until it was the consistency of dust. It was really cool to garnish both savory and sweet dishes with. I thought it might be fun to do something like that for our strawberry dessert (and I had large quantities of strawberries to use). It's time consuming and sort of tricky to dehydrate things without an actual dehydrator. I sliced my berries (and tomatoes and red peppers-but that didn't work as well) thin and put them on a pan with parchment paper. I set the oven to 170 degrees and it took several hours over the course of 2 days to get the berries sufficiently dry and crispy, and even then a few got slightly darker brown than I would have liked. Once the berries were dry and brittle, I put them in the food processor with a little bit of sugar and processed away for what seemed like days. In the end I had to run the dust through a fine mesh strainer to get it down to the size I wanted, but it worked out pretty well and looked nice on the dessert plates.


Try some dust of your own, the color and taste possibilities are endless!
And Chop on.